

Is your 2-stroke smoking a bit more than it should?

Fouled plug? Oil on your swingarm?

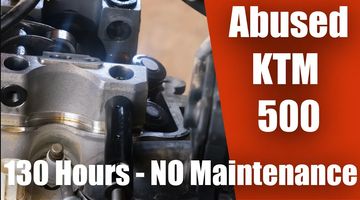
Chances are that your crankshaft seal is on its last legs and needs to be replaced. Don’t worry, we can walk you through how to do it! (We even made a video!)

The tools that you will need to complete the job are pretty standard for the most part. A torque wrench, a collection of pliers, multiple sizes of flat head screwdrivers, box end wrenches, torx bits (and driver), a scribe, allen keys, a breaker bar, sockets with ratchet and extensions, a set of clutch pliers, and a dead-blow or rubber hammer round out the standard stuff. We use a Motion Pro gear jamming tool which works better than shoving a screwdriver in to stop things from moving, and a large piece of copper pipe as a seal driver. Also on your list should be some blue loctite and silicone gasket maker, plus a razor blade to remove any of the stuck old gasket.

The parts list for this job is a little bit shorter than the tool list - Clutch cover gasket, crankshaft seal, o-ring for behind the crankshaft seal, metal collar (optional, but you might as well replace it while you are in there), and a locking washer for clutch stack.
The disassembly process begins with removing the expansion chamber, kickstart lever, and brake lever.
With that done, you can then drain oil and coolant which will allow you to remove power valve side cover and coolant hoses, water pump, and all of the bolts that hold on the inner clutch cover.
The connecting arm for the power valve needs to be popped off before removing the main cover. It is held on by a little clip that is going to want to relocate itself either into the clutch area or worse, into that crack in the garage floor that you are meaning to fix. We limit the likelihood of this by placing a rag or some paper towel to cover the opening into the clutch. Gently pry it up with a small flathead screwdriver, rotate it around, and pull it out from there to remove. The lever itself is then easy to pop off the ball socket with a larger screwdriver and a bit of leverage. From there the cover should just lift away.

Next, remove the nut off the end of the crankshaft. Here is where the Motion Pro gear jamming tool comes into play. Place it in between the gear teeth which will allow you to remove the left handed thread nut on the crankshaft. There will be a locking washer behind the nut, so keep track of that.
Chances are you will find that the clutch stack is in the way of removing the gear on the end of the crankshaft, so you guessed it…Remove the clutch stack.

Start with the clutch plate bolts, working in a star pattern so as to keep from putting any sort of weird tension on the stack. The world has enough weird tension in it already, don’t add to it here.
With the bolts removed you should be able to remove the whole stack all at once. If the throw out bearing and rod didn’t come out with your clutch plates, pull that out as well.
Next the clutch nut and locking washer will need to be removed, allowing the clutch basket to take a break from being attached to the bike. The locking washer tabs behind the clutch nut will need to be bent back in order to remove the nut, and it is extremely important to not put any sideways pressure on the perches so use caution about where you are applying pressure to bend the tabs. Too much pressure in the wrong direction and it will be another trip to the dealership for a replacement clutch hub. We avoid the perches altogether by bending the tabs back with a screwdriver and American ingenuity… AKA a dead-blow hammer.
Since the nut is going to want to spin with the clutch basket, you will need to wedge the basket in place using a pair of clutch pliers. To avoid marring the aluminum we wrap the ends of our clutch pliers with blue shop towel bits before inserting the tool into the groves. The pliers will then rest against the foot peg, providing the leverage needed to remove the nut and washer behind it.
With the nut removed, the hub will slide right out, and with it will come a spacing washer that you will need to make sure to keep track of. The basket should then slide out, revealing a bearing that can stay on the shaft as it will not be in the way.
With all that removed, you can then pull off the gear on the end of the crankshaft, and finally we are into the meat and potatoes of the job…the crankshaft seal.
We have a replacement collar on hand when we do this job, so we use pliers to remove it. If you don’t have a replacement, you have the tricky task of trying to grip an oil-covered, metal part with your fingertips so as to not mar the collar.
We replace the collar because chances are there will be some scoring on it, and since we have to take it off anyway, why not put a fresh one in?
Next up is removing the seal itself. You can use a seal removal tool, or if you don’t have one handy a flathead screwdriver is also an option. Either way, take care as to not put any pressure on the crankshaft itself as you can ding the surface.

Using a scribe or other pointy tool, the final step before reassembly is plucking out the rubber o-ring, taking care not to scratch the surface making it impossible for the replacement seal to do its job properly.
From there it is basically doing things in reverse order, starting with carefully reinserting the new o-ring so as to not cut it and reduce its functionality.
We add some oil to the rubber parts of the crankshaft seal to assure that they are well lubricated. We place it in by hand as tight and evenly as possible, and then use the piece of copper pipe and our trusty dead-blow hammer to tap it into position.
Once it is in place, the collar and gear can be put back on the crankshaft, and then it is almost time to put the clutch bits back in.
Now would be a great time to make sure that there are not any bits of gasket remaining on the motor and cover. You could be like us and remember to do this after putting the clutch back together, but that is a bit more work and we don’t recommend it. Use a gasket scraper or razor blade to dislodge any cling-ons from the old gasket, taking care to not leave any bits inside the clutch area.
When replacing the basket, make sure that the gear that connects to the kickstarter and the gear to the crankshaft are lined up, that is if you want the motorcycle to start and then go. With that in place, the spacing washer and clutch hub will slide in, followed by a new locking washer.
The new locking washer will have a bent tab that lines up with a slot on the hub, so make sure that lines up before adding the nut and torquing it to the spec indicated. In this case it is 100nm, or about 74 foot pounds. You will of course need to use the shop-towel-wrapped clutch pliers to do so.
Once that is torqued correctly, it is time to bend the two locking tabs up on the washer. Once again, it is very important to not apply too much sideways pressure to the bolt holes or perches. We use copious amounts of blue shop towels to lessen the pressure and pry up the tabs with a screwdriver just enough so we can get a grip on the tabs with some pliers to finish the job.
Reassemble the rest of the clutch, taking care to put the clutch stack back in as you found it, and torque the bolts to spec.

Replace the locking washer and add some blue loctite to the threads of the crankshaft before spinning on the nut and tightening it to the correct torque levels, which in this case is 150 Newton meters or 111 foot pounds.
If you cleaned the mating surface on the bike and cover already, add the new gasket, and replace the cover and water pump.
Press the power valve connecting arm back into place, and cover up the opening with your trusty blue shop towel before attaching the clip. The last thing you want to do at this stage is to have to take it all apart to recover the clip.
Replace the coolant line, the kickstarter, and brake lever and then it is time to replace the fluids. The final step is to replace the exhaust bits that you removed in the first step, and then do some celebratory wheelies through your neighborhood, or if you like your neighbors, load up and hit some singletrack.